Tag Archives: Heather Ross Fabric

I Like You

I do like you, and I also really like this Far Far Away II fabric by Heather Ross.

ILU8

For those of you who have been following Heather for a long time, you probably recognize the name of this collection.  Heather originally released Far Far Away in quilting cotton back in 2014.  Last fall, she released Far Far Away II with new fabrics and new colors.

ILU1

I’m not sure I can pick a favorite, but the moons are pretty high on the list.  So are the paper hats.  And the honey jars.  And the flowers.  And, and, and…see the problem trying to choose?

ILU3

There are very few artists who do juvenile fabrics well, and Heather is on that short list.  So often “kid fabrics” are cheesy or are your typical teddy bears or trains or something else that’s been done a million times.  Heather keeps it new and fresh every time and her fabrics work for kids and adults alike.

ILU4

As for this pattern, I wanted to do something diamond-like with a twist, and this is what I came up with.

ILU6

I also mixed in some solids to help break it up.

ILU5

This quilt comes together pretty quickly because it has larger pieces, which was intentional. Since some of the fabrics have large-scale prints, I wanted to be able to show them off as much as possible.

ILU2

I did put quite a bit of time and thought into the fabric placement.  My main goal was to evenly distribute the fabric by color and then try to avoid having flowers next to one another, moons next to one another, etc. I think it works.

ILU7

That’s it for now.  I’m not quite ready to quilt this one.  I’m thinking about using a vintage sheet for the quilt back, but that’s still TBD.  I’ll keep you posted.

Star Rush

Mark this day in history. I made a red quilt.  Or red(ish) quilt.  It’s not totally red, but close.  This is noteworthy because I’m not into red.  It’s not my color.  I don’t wear red, I don’t decorate with red, and I use it very sparingly in my quilts. I know a lot of people love it; I just don’t.  But once in a while you have to get out of your color comfort zone, and that’s what I did.

IMG_7174

I have to start by saying I’m not 100 percent into this quilt.  I think I missed the mark just a bit on my fabric selection.  I wanted to use up some scrap fabric and use what I had in my stash, but (shocking!!!) I don’t have a lot of red fabric.  And my lack of red fabric kind of came back to bite me, but I didn’t realize it until the quilt was pieced together, and I was not going to start over.

IMG_7183

Notice the darker red points on the stars?  Not all of them are as dark as they should be and don’t stand out enough as the corner star pieces.  In a few of them the red fabric is just a bit too light and it doesn’t define the star points enough, in my opinion.

4E56456A-81E3-4E5C-BBE8-20B08344693B

The fabric I do think I got very right is the strawberry background fabric.  It is the special reprint of the Heather Ross strawberries from her Briar Rose collection.  Even though it’s red, I could use those strawberries all day every day.  Love them.

IMG_7181

My feeling with this quilt is that, it is what it is.  I don’t hate it by any means, it’s just not 100 percent there.  Close, but not quite.  More importantly, it’s a lesson learned that in the future I need to define those star points with darker fabric!

Trixie Project for Heather Ross

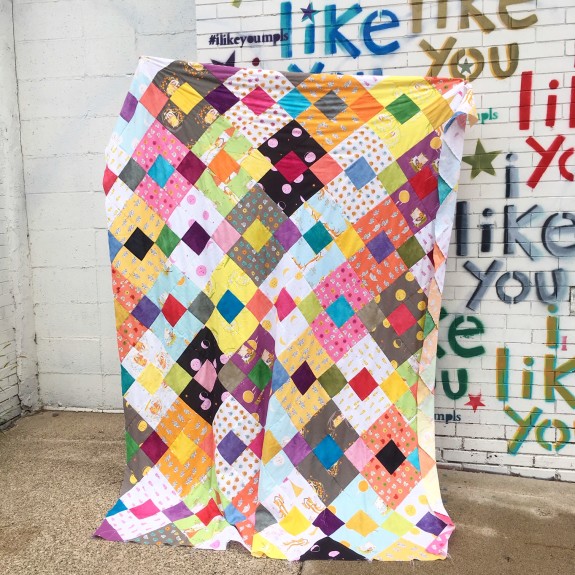
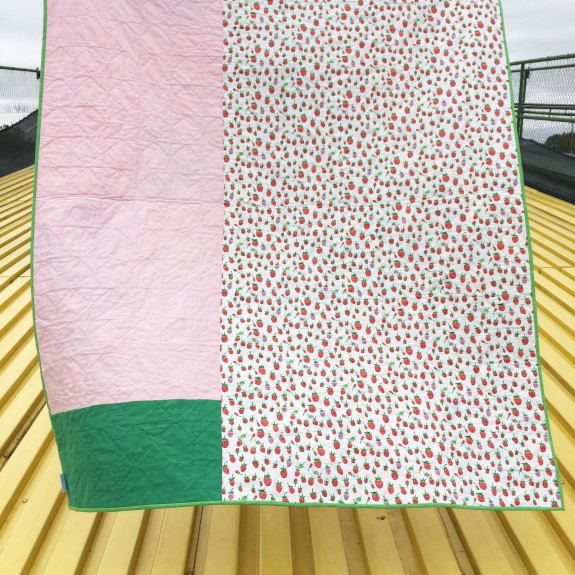
The new Trixie fabric collection from Heather Ross is now shipping.  Hooray!  Given that it is finally available in stores, I wanted to share the quilt I made for the look book.  I think this is the fourth quilt I’ve made for one of Heather’s fabric collections and it’s so fun each time.

Screen Shot 2018-10-11 at 11.08.49 AM

The Trixie collection is named for the cute little mouse featured in the fabric.  In addition to Trixie, there is some gingham checks, florals and strawberries as well.  I’m very smitten with Trixie and I think you will be, too.

IMG_5486

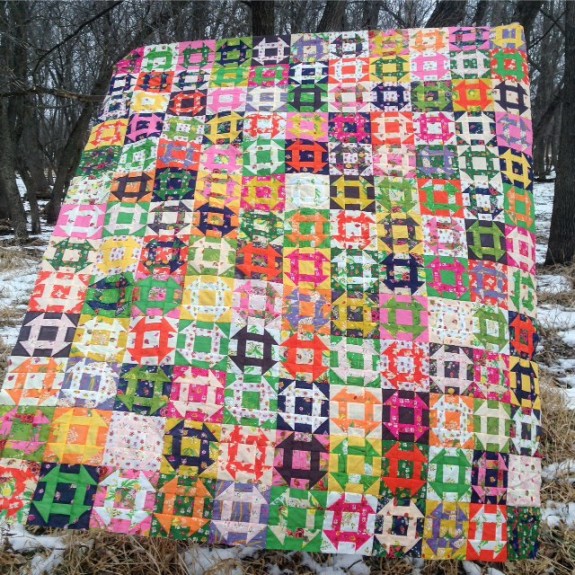
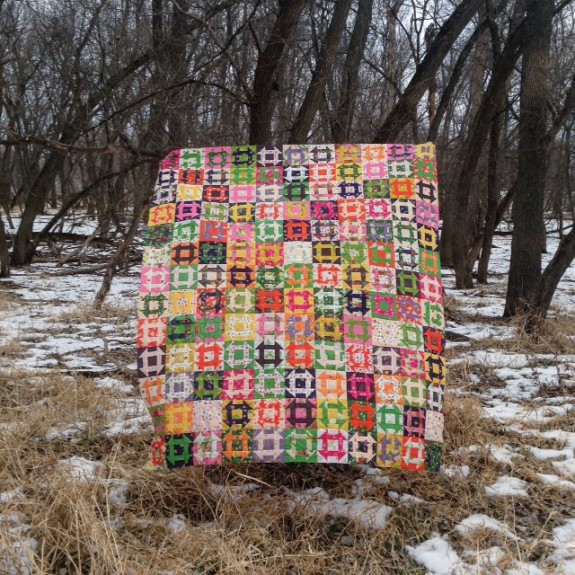
For the look book, Heather asked me to make a wonky log cabin quilt using the pink, purple, orange, red and yellow colorways.  Shockingly I had never made a log cabin quilt so I was more than game.

Screen Shot 2018-08-31 at 2.11.57 PM

The pattern for this quilt is available for sale if you want more specific instructions.  You can visit the Windham website where you will find retailers that are carrying it.  I did not write the pattern and haven’t seen it – I simply provided my notes to the pattern writer – so I can’t speak to specifics in the written pattern, but some of you have messaged me directly asking for more info so I thought I would give a few tips and tricks.

Heather wanted a large quilt which made it quite the project to tackle.  Each block is a finished 12” and I made the quilt 96” x 96”.  That requires making 64 total blocks.  That’s A. Lot. Of. Blocks.  You can make it smaller, but in order to get the repeating pattern it limits your size options a bit.

Note: Most of the images you will see are photos I took before it went to the long arm.

IMG_5946

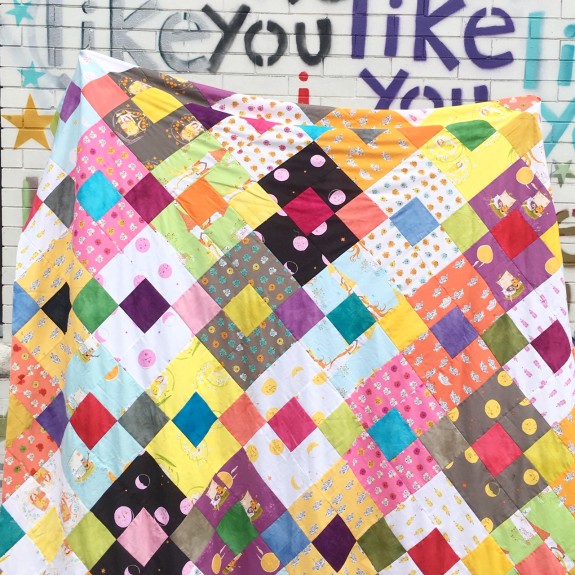
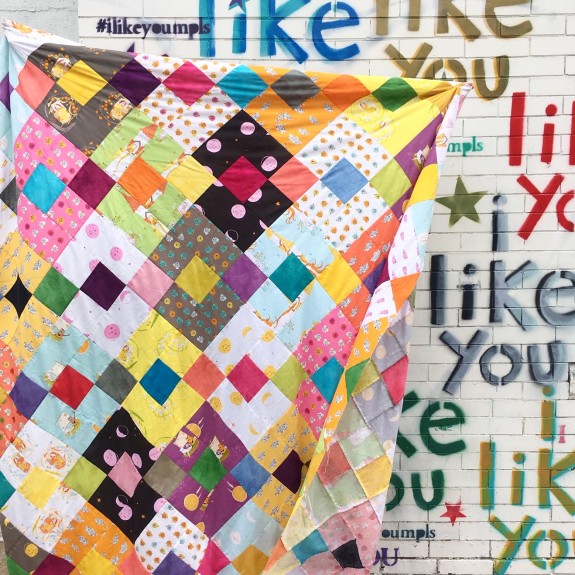
This quilt is not all Trixie fabric but also has solids from Marcia Derse’s Palette collection.  There are pinks, purples, reds and yellows to coordinate with the Trixie fabric.  To get the log cabin look, I used varying shades of gray and white as well.  I also mixed in the white and peach mouse print and the peach floral print to add some additional variation to the white and gray solids.

IMG_5941

You could eliminate the wonky part and make this a standard log cabin quilt if you wanted.  It would definitely take less time than making all those wonky cuts, but if you do want a wonky version, this is how I did it:

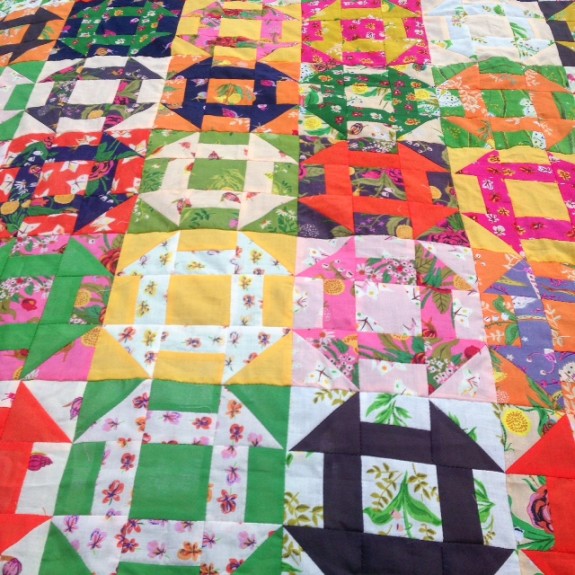
I cut some pieces in each block at an angle but it’s mostly made of curves.  Some have slight curves and others have more obvious curves – it’s your personal preference.

IMG_5943

If you are unfamiliar with sewing curves, there are lots of YouTube videos that will show you how. Don’t be afraid to give them a try! The nice thing about these wonky curves is that you really can’t screw them up. If one piece gets really narrow, don’t worry!  You can make it up later with a wider piece.

While each block in this quilt is different, there is some consistency in all of them.  Let me explain.

Like I said, the finished blocks are 12” or 12.5” before sewn together.

The block pattern calls for a specific number of pieces in each block.  I stuck to that number for each block but made the curves in each piece different. That provides a bit of consistency and, most importantly, makes it easier to have each block be about half low volume fabrics and half dark fabrics.

You can fudge the 50/50 low vs. high volume fabrics a bit, but you don’t want to stray too far from being half and half or it won’t look wonky but instead will just look odd.

IMG_5945

As I finished making each block they were not perfectly square.  I made them each around 13.5” (give or take) and then used a 12.5” square ruler to square them up.  I highly recommend investing in the square ruler, whether you are making a wonky version or even a straight-line version.  It is a lifesaver.

My only other tip is to find a large space to lay the blocks out as you go.  I really had to step back and see the whole thing as I was going to make sure I had the color and fabric variation just right.  And I still feel like I missed the mark a bit!  It wasn’t until the very end that I decided I used too much bright yellow fabric.  I wish I would have used about a third less.

IMG_5942

I would add one other note about the fabric direction in each block.  Some people are sticklers for having the fabric all go in the same or “right” direction in a quilt.  I am not one of those people (most of the time).  I kind of think that a quilt will be viewed from all different angles while it’s being used so it doesn’t matter if your fabric is all going in the “right” direction.  Just my two cents, but you do you.

IMG_5944

So that’s it.  If you have any other questions feel free to comment and I will try to reply.

Screen Shot 2018-10-11 at 11.09.14 AM

And if you want to see the entire Trixie look book and the other quilt projects you can check it out on Windham’s website here.  There are some amazing quilts made by my very talented quilting friends.  Go give it a look.

Sugarplum Quilt for Heather Ross

Happy holiday season!  Now that Thanksgiving is over, we’ve officially reached that magical time of year when it’s time to start decorating.  So grab your tree, all the ornaments, your Christmas quilts, and get started!

Don’t have Christmas quilt, you say?  No worries! I’ve got you covered.

Today I’m sharing a quick and easy Big Star quilt you can make using Christmas-themed fabric, all in an afternoon.  Seriously.  This mini quilt takes very little time and can be cut and pieced long before Santa arrives. It’s also a great project to do with kids.

IMG_6207

I made this sweet little mini star quilt way back in October of last year.  Heather asked me to make it for her Sugarplum collection that she was showing that same month at Quilt Market.

There was never a look book made for Sugarplum but you can see all of the fabrics here.  This collection has been in stores since last spring, however I’m sure it’s still available for purchase at many places, especially online shops.

IMG_6203

This pattern is made using 9-7/8squares cut in half to make the triangles.  The four corner squares are 9-½” each.  If you want more specific instructions I found this pattern online that is very similar and provides step-by-step info.  That pattern, however, includes a border and I did not use a border on mine, but I think it would look cute either way.

IMG_6208

This quilt is small enough that a standard cut of fabric is wide enough for the back.  I don’t have a picture of it, but the back of this quilt uses the Sugarplum large-scale mice print, and the border is the pink peppermint candy fabric, which just may be my favorite from the collection.

Screen Shot 2018-11-25 at 6.52.28 PM

So there you have it. A mini star quilt that will add a little bit of holiday cheer to your home.

Wonderland – Finished

Doesn’t it feel good to finish a quilt you’ve had sitting around for a long time?  This Wonderland quilt, named for its Alice in Wonderland vibes, had been sitting in a pile of unfinished quilt tops for three years.  It wasn’t until the beginning of this year that I finally decided to tackle it.

IMG_6038

My Wonderland quilt uses Denyse Schmidt New Bedford fabric surrounded by a black and white checkboard pattern, which is what reminds me so much of Alice in Wonderland.

IMG_6043

I mentioned in an earlier blog postthat I started with the New Bedford fabric centerpieces and the quilt kept growing from there.  To get the New Bedford fabric and the checkerboard all looking centered and evenly distributed, the quilt kept getting bigger and bigger. It’s not the size I planned on but I’ll take it.  I rarely make quilts this big so I think it’s good to have some larger quilts in my collection.

IMG_6045

The reason this quilt took so long to finish is because the large size made me take longer than normal to choose the right quilt back.

IMG_6044

I had the main piece of fabric I wanted to use for the back – a large cut of Liberty of London pink floral – but I knew I needed something more.

IMG_6041

After digging through my stash, I realized that Sleeping Porch fabric by Heather Ross would work well.

IMG_6039

Now the back has a little corner of Sleeping Porch fabric that I quite like.

IMG_6040

The binding on this quilt is also Denyse Schmidt and is from one of her old collections she did with Joann Fabric.

IMG_6046

It feels pretty satisfying to have this quilt finally done.  And I like it so much I’m even using it on my own bed.

IMG_6042

Now I’m just working on getting the right pink shams to make the bed complete.

County Fair

Confession: My favorite part about going to the fair is the food.  I should probably say I like going to the quilt exhibit to see all the entries and who won, but let’s be honest.  Those mini donuts that come out greasy and hot and covered in cinnamon and sugar…to die for.

But anyway, back to quilts.

Today’s quilt is aptly named County Fair for the photo location, and because it is made with Kinder fabric by Heather Ross.  And kids + the fair go hand-in-hand.

IMG_5931

I was at my parents’ house in Iowa recently and skipped on over to the county fairgrounds to snap some pictures.  Sadly, I wasn’t there during the fair so I couldn’t get any of those mini donuts, but it did offer some good photo options.

IMG_5937

This quilt pattern is super easy.  As I was making the blocks I posted the below picture to Instagramand someone asked what the block pattern was. All it is are nine squares-in-squares sewn together to make a block.  Easy breezy.

IMG_5284

I was a bit hesitant to use the Kinder fabric for this pattern because Kinder has some larger-scale prints and once you cut them up you lose them, but I had this specific pattern idea for Kinder in my head and couldn’t shake it.  So I did what I wanted and made it!

IMG_5938

I was able to make this quilt using a fat quarter bundle, but it can easily be scaled up or down.

IMG_5935

I spent quite a bit of time laying out my fabrics and deciding which ones to pair together and where to put the blocks so that the color was evenly distributed.

IMG_5933

I even went so far as to use an Excel document to fill squares in with color so I could easily visualize how it would look.  If you don’t have any fancy design programs, Excel can get the job done if you just want to see color placement.

IMG_5936

The back of this quilt is scrappy, like most of my quilt backs are.

IMG_5932

IMG_5939

It uses the limited edition strawberry print from Heather along with some Kona Cotton Baby Pink and a small piece of Windham’s Artisan Cotton in green.  I have a lot of yardage of that strawberry print so you can expect to see that again.

IMG_5940

This quilt is perfect for a kid, or a kid at heart.  But that’s kind of how I feel about most of Heather’s fabrics.

IMG_5934

P.S. In case you missed it, I made a Kinder quilt for Heather’s look book last year.  You can check it out here.  It’s a crib quilt and kind of improv with a lot of curves and even some applique.

Kinder Project for Heather Ross

I’m so excited to share a project with you I secretly did this summer.  Remember in an earlier blog post when I promised I was working on a lot of things I couldn’t share yet?  This was one of those things!  I made a quilt for Heather’s next collection, Kinder.

Screen Shot 2017-09-11 at 2.05.41 PM

I love Heather, I love her fabrics, and I always love helping her out with projects to showcase her new collections.  (Reminder: I made a quilt last year for Sleeping Porch. You can check it out here.)

The Kinder look book is now available (find it here) and you can check out all the beautiful projects using the collection, including the crib quilt I made.

Screen Shot 2017-09-11 at 2.05.19 PM

This quilt had a couple of challenges, mainly sewing curves.  I never sew curves!  I had to do a double-think on those curves.  Is that a thing, a double-think?  I’m not sure if it is but I had to do some extra thinking on how to sew them; it’s been awhile.

Sewing curves are really not that hard, especially once you get started and into the swing of them.  And even though I had to spend a little bit more time on this project to make the curves, I’m glad I had to make them.  It gave me an opportunity to brush up on my skills, and sometimes it’s good to push yourself to do something you’re not always comfortable doing.

This design is based on a sketch Heather did.  You can download the sketch for free on her website to make your own version of this quilt, if you would like.

Here’s some pictures I took of the quilt top before it was quilted.  You can see all those wonky curves.

IMG_4276

The great thing about this pattern/sketch is that you can pretty much make it your own.  Want a lot of little curves?  Go for it.  Want some bigger, more subtle curves?  You can do that too.

IMG_4280

IMG_4279

My quilting friend Mary did a version of this quilt for the look book as well.  (Hi Mary!)  I made the PENELOPE quilt and Mary made the OLIVER quilt.  She also did the quilting for both, and I highly recommend her if you are looking for someone to longarm for you.  You can find Mary here.

Screen Shot 2017-09-11 at 2.05.00 PM

The other challenging part of this quilt was the applique.  Or maybe I shouldn’t say it was challenging – it was not – but instead I should say that it’s a type of quilting I really don’t do.  I don’t know why I don’t do it, because now I’m thinking I should!  Applique is a great project to work on when you don’t have access to a sewing machine, or when you just want to sit on the couch watching TV and do a little hand sewing.

Anyway…the PENELOPE letters are appliqued on.  It was very easy and didn’t take long, but really adds to the quilt.

IMG_4278

Having the alphabet print in the Kinder collection means there are many opportunities to cut individual letters for appliqueing names or other words on the quilt, which is such a special way to personalize a baby quilt.

Screen Shot 2017-09-11 at 2.51.35 PMScreen Shot 2017-09-11 at 2.50.57 PMScreen Shot 2017-09-11 at 2.50.41 PMScreen Shot 2017-09-11 at 2.50.25 PMScreen Shot 2017-09-11 at 2.50.14 PM

I love this collection.  It is classic Heather Ross designs.  The colors are great, the prints are great, and there are so many fun projects you can make with it – both for kids and adults.

Go check out the look book and start planning your projects for when it ships next year!

Sleeping Porch Project for Heather Ross

This blog post is a little late.  But as they say, better late than never!

This project started last May, when fabric designer Heather Ross asked me to make a quilt for her new fabric collection, Sleeping Porch.  I’ve mentioned this on Instagram but I’ve never officially shared it on the blog.  And now that Sleeping Porch is shipping to retailers, I thought it was about time to write about it!

Heather had a group of us create quilts from Denyse Schmidt’s book Modern Quilts, Traditional Inspiration for her new line.  She asked me to make the Ocean Waves pattern and use three different prints from the collection along with the solid orange color for the front and the solid yellow color for the back.

42209-3 42206-7 42205-342211-12 42211-9

The result is a very bold, striking quilt, which I love.

Please excuse this bad, not color corrected photo, but you can see how I used mostly the purple snail and floral prints and sprinkled in the green Peonies.

IMG_3705

All the quilts are featured in the look book that Windham put out for the release of the fabric, and the photos were taken at Heather’s house upstate New York (insert all the heart eye emoji’s).

You can see the entire look book HERE.

Screen Shot 2017-03-08 at 12.41.27 PM

I love the photo spread of my Ocean Waves quilt.

Screen Shot 2017-03-08 at 12.44.08 PM

I’m so happy I had the opportunity to work on this project.  The fabric is beautiful and Denyse’s Ocean Waves pattern is such a classic.  I think I have to make an Ocean Waves quilt for myself one day.

I recently finished another quilt project for a fabric designer with a new line coming out that I can’t wait to tell you about, just as soon as I can!

Before I go, as a reminder, I had Sleeping Porch fabric left from this project and I made a Churn Dash quilt that you can see HERE.

Churn Dash

You know those quilts that become some of your favorite ever?  Well, I think this one is going to end up on my list of favorites.  I love it.  And I think the main reason I love it so much is the fabric.

This Churn Dash quilt is made with the new Heather Ross Sleeping Porch collection, which starts shipping to retailers this month.

IMG_4637

I was fortunate enough to get my hands on this fabric early.  Last Spring, Heather asked me to make a quilt with fabric from her new collection, which would then be photographed for the Look Book.  And now that I write that I realize I haven’t done a blog post about that project!  Ahhh!  I’ve mentioned it on Instagram but I haven’t officially written about it on the blog.  (Note to self: I need to make that project my next blog post.)

Anyway, I finished that quilt and I was lucky enough to have a fat quarter bundle of the fabric left.  The bundle includes 19 prints and six coordinating solids.

IMG_4236

This collection is all cotton lawn.  I’ve had a couple of people ask me how it was to work with and it was great.  I’ve used cotton lawn before but mostly for quilt backs.  If memory serves me correct, this was the first time I’ve used cotton lawn for an entire quilt.

IMG_4641

This, of course, is only the quilt top, but I think the whole thing is going to be so soft and dreamy when it’s all done.  (I plan to use cotton lawn for the back, too.)

IMG_4643

But back to the design.  I was planning to do something different and had a few ideas sketched out, but in the end, I realized what I really wanted to make was a Churn Dash quilt.

IMG_4244

This is my first time making a Churn Dash quilt.  Seriously!  I couldn’t believe it either, but I think it was a good choice because it highlights the many different prints and solids of the Sleeping Porch fabric beautifully.

IMG_4644

When pairing the fabrics, I tried to make sure I did as many different color and print combinations as possible.

IMG_4645

I lined up all of the blocks so I could keep track of which fabrics and combinations I had used and which ones I hadn’t.

IMG_4647

Then, when I started to lay the quilt out, I stacked the blocks in color families.  That way I knew how many green/blue, pink/white, purple/yellow, etc. color combinations I had.  After that, I just did my best to randomly place the blocks so that the colors were distributed throughout as evenly as possible.

IMG_4642

I love the colors and prints of the Sleeping Porch fabric.  I’m so happy with this quilt and can’t wait to finish it!

Tiger Lily – Finished

I’m so happy to share this finished quilt with you.  Why, you ask?  Because it is one of my very favorites.  My love for it is mostly due to the fabric.  It is the Tiger Lily collection by Heather Ross and it is perfection.

img_4315

Don’t you love those colors?

img_4318

I was looking back to find when I first shared the quilt top and it was almost a year ago.  You can read that blog post here.  It took me a while to finish it because I didn’t know what fabric I wanted to use for the back.  Then the obvious answer came to me late this summer.

img_4316

The back uses Heather’s soon-to-be-released collection, Sleeping Porch.  And now that I’m writing that I realize that I haven’t shared the Sleeping Porch project I worked on with Heather on the blog!  I know I’ve talked about it on Instagram but I haven’t shared it here.  I’m going to write about it more later, but the short story is that I made a quilt for Heather using her Sleeping Porch collection, and the quilt was used for the new line’s lookbook.

Anyway…I had a bunch of fabric leftover from that project and it was the perfect option to use for the back of my Tiger Lily quilt.  The colors worked, the prints worked, and the new Sleeping Porch collection is made with super soft cotton lawn.

img_4320

Normally, I tend to do more straight line quilting, but for this quilt I left my comfort zone and went with a flower design.  I’m really not a “flowery design” kind of person, but it just fit the theme of fabrics.

img_4319

And that is my finished Tiger Lily quilt.

img_4317

I have two more projects to share with you…just as soon as I get them photographed!